Knowledge Base

Code Signing Certificate Installation for Internet Explorer
Code Signing Certificate Installation for Internet Explorer
Using Internet Explorer as your browser and the same PC which generated the order, follow the "pick-up" or "collection" link in the email and initiate the downloading process. The in-browser script will automatically pull the previously stored private key from the browser's file system and install it in your Certificate Manager folder.
Now, to receive the actual certificate, you must export the certificate and private key and save it to your PC/desktop as a PFX (.p12) file. Follow the detailed instructions below to navigate through the export process in Internet Explorer
Note: This article also applies to e-mail signing certificates.
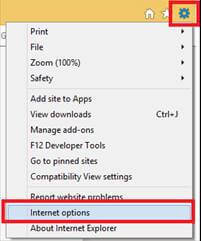
- Open Internet Explorer
- Navigate to Tools, then click Internet Options
- Select the Content tab and click the Certificates button

- Click Personal tab and select your Certificate Name

- Click Export

- Click Next in the Certificate Export Wizard
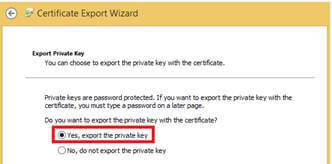
- Select Yes, export the private key and click Next
- Click Personal Information Exchange and Include all certificates in the certification path if possible and click Next

- Click Password and type a secured password and click Next
Note: This password will be required later during installation.

- Enter File Name and click Next

- Click Finish and you've successfully backed up your certificate and private key(s)

Once the code signing certificate and private key are bundled together in a PFX (.p12) file, you can finally proceed with signing your application using the appropriate signing tool or send it to your developer(s) for completion.