Knowledge Base

CSR Generation for Mac OS X El Capitan (v.10.11)
The following instructions will guide you through the CSR generation process on Mac OS C El Capitan (v.10.11)
-
Launch the Mac OS El Capitan (v.10.11) Server App.
-
From the Finder window, under Favorites, select Applications and then Server.

-
From the Server App window, under Choose a Mac, select one of the following options to determine where to create the CSR and install the SSL certificate once issued.
-
To make a CSR on the current server:
-
Click This Mac – YourServerName and click Continue.
-
Enter the Administrator Name and Password and click Allow.
-
-
To make a CSR on another server:
-
Click Other Mac – YourOtherServerName and click Continue.
-
Enter your Host Name and IP Address.
-
Enter the Administrator Name and Password and click Allow.
-
-

-
-
From the Server App window, under Server, click Certificates.

-
In the Certificates page, click + (at the bottom) and select Get a Trusted Certificate…
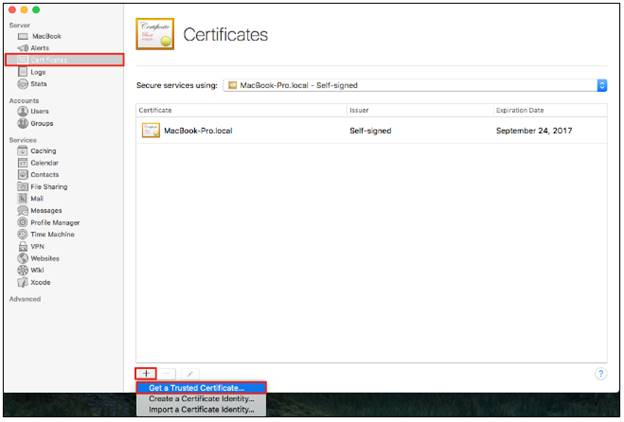

-
Click Next on the Get a Trusted Certificate page.

-
Enter your CSR details and click Next.

-
Click Save and then Finish.

Note: Make sure you remember the filename and file path where the CSR was saved. -
Locate and open the newly created CSR from the specified location you choose in a text editor such as Notepad and copy all the text including:
-----BEGIN CERTIFICATE REQUEST-----
And
-----END CERTIFICATE REQUEST-----
Log into your Sectigo account
Click on the Provide CSR on our website and paste the entire CSR into the blank text box and continue with completing the generation process.